How to Root Your Google Nexus 7 2013 2nd Generation and 2012 1st Generation TabletThis step by step guide will help you unlock the bootloader, root your tablet, install a superuser app, busybox, and a custom recovery.Rooting, for those of you that don't know, means giving yourself root permissions on your Android device. This is similar to running programs as administrators in Windows, or running a command with sudo in Linux. With a rooted Android device, you can run apps that are normally blocked because they require access to the system area of your device. The locked system partition on an Android phone or tablet allows the vendor to channel the usage of the device to enhance their profit potential, much as Amazon did with the Kindle Fire which limited purchasing apps to the Amazon App Store. With root you can also install developed ROM’s, which are custom versions of the Android operating system that are preconfigured with many helpful apps that require root access. Custom ROM’s are like a facelift for and Android device. Recovery on an Android device is a utility accessed on startup which allows you to wipe user data and reset your device to the factory state, but with root you can install a custom recovery like TWRP or CWM. Custom recoveries will allow you to create a full backup of your device, install custom ROM’s and kernels for over clocking your device. We will discuss these features in more depth in additional topics.
In Summery Rooting will allow you to:1.Install a custom recovery like TWRP or CWM or other software
2.Run apps that require root permissions, such as Titanium Backup or AdAway
3.Completely backup and restore the device (Nandroid Backup) or flash custom ROMS
Some cautions before starting:1.Since unlocking the bootloader will wipe all data from your device, it’s a good idea either to back everything up before starting. This means pictures, music, videos, etc.
2.You will have to reinstall all of your apps and you will be prompted to enter your Google account information
3.Go to Settings then about and check for updates and update to the latest version for your tablet before starting (Version 4.3 at the time of this topic)
4.Rooting your device is not illegal, but it will void your warranty. The rooting program does have the option to relock the bootloader and remove root if you require warranty service.
5.There is always the chance that you can brick your device, which is very unlikely if you follow the steps correctly, but I assume no responsibility for your device.
Fortunately for our purpose Android Developers have produced “Nexus Root Toolkits†which support a one click root for our Nexus 7 2013. Step 1:Pick your Toolkit from the two that I have used:
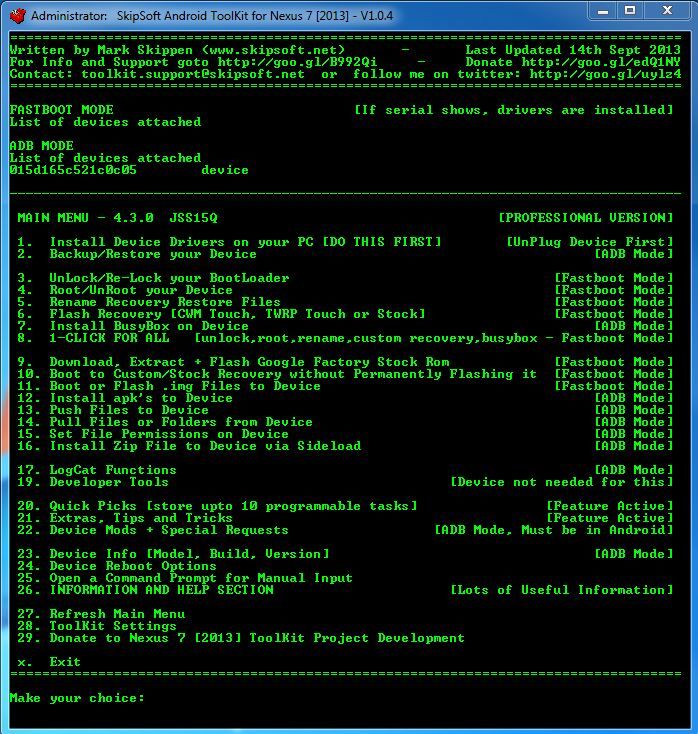
- Mark Skippen's Nexus 7 Universal Toolkit on xda Here
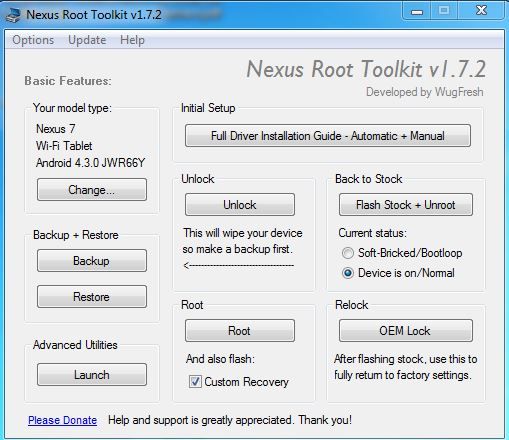
- WugFresh's Nexus Root Toolkit Here
Each Toolkit has advantages and both offer a free version, but I have chosen to donate to both developers to support their work. The WugFresh toolkit supports multiple Nexus Devices, and while Mark Skippen's Universal Toolkit supports multiple Nexus devices, it offers a donate version, for more timely updates.
Step 2:
On your Nexus 7 Tablet
1.Swipe down from the top of the screen to open the control area.
2.Tap the settings icon in the upper right corner.
3.Scroll down to "About tablet" and tap to open.
4.Tap the Build number 7 times and you will see the notification that you are now a developer.
5. Go back one level and you will see "Developer options" above "About tablet"
6.Tap to open Developer options and check the box that says USB debugging
7.Hit the back button to return to the previous screen
8.Tap the “About tablet†option.
8.Make a note of the Android Version and the Build number — (Example: Android 4.3 and Build JSS15R at the time of this topic on the 2nd generation tablet)
Step 3:On your PC install the toolkit of your choice, select your device, and allow the appropriate files to download.Installing driversMark Skippen Toolkit - Select Option 1 'Install Device drivers on your PC and plug in the table when prompted, following the prompts. You are successful when the Windows Device Manager shows your tablet as “Android Phone†\ “Android ADB Interfaceâ€
 WugFressh Toolkit
 - Open the Nexus Root Toolkit and click the button that says “Full Driver Installation Guide.†If you’re running Windows 7 you can try the Automatic Driver Configuration option on the next screen.
Follow the instructions, and connect your Nexus 7 to your PC with a USB cable when prompted to do so.
If the automatic configuration does not work and you receive an error message, right click on “Computer†in the start menu or on the desktop and left click on “manage†then left click on “Device Manager†and look for “Nexus 7†in the right panel, right click on “Nexus 7†select “update driverâ€. Then browse for files look in C:\Wugs_NexusRootToolkit.v1.5.2\data\drivers. Then accept to install the driver. You are successful when the Windows Device Manager shows your tablet as “Android Phone†\ “Android ADB Interfaceâ€
 Step 4:Unlocking bootloader, rooting, and installing custom recoveryPre-root Tips
- Verify that the Android version and build number that you select in the toolkit corresponds with the one you found in the About tablet area.
- Restart the tablet after enabling USB Debugging and verify
- Remove screen locks or remember to unlock the screen when the tablet reboots during the rooting process
Mark Skippen Toolkit - Select Option 8 (1 Click for all - Unlock, root,rename, custom recovery, busybox)
The process takes a few minutes, and your device will reboot a few times to run Fastboot and recovery. Don’t worry. This is normal.
Read the screen prompts carefully and follow the instructions and you should safely unlock the bootloader, indicated by the unlocked image on the initial Google splash screen. You will be prompted for the Super User app (I can verify SuperSU) and for the custom recovery (Choose TWRP as suggested). Remember to read and follow the screen prompts and you should have no problem rooting your Nexus 7 2013.
WugFressh Toolkit - Open the Nexus Root Toolkit and click the button that says:
1. Unlock - Read the screen prompts carefully and follow the instructions and you should safely unlock the bootloader, indicated by the unlocked image on the initial Google splash screen. Note your device will restart to run Fastboot, again follow the prompts.
2. In the toolkit check "Custom Recovery" and click "Root". You will reboot to run Fastboot, again read and follow the prompts and you should have no problem rooting your Nexus 7 2013.
Step 5When your device reboots, setup your Nexus with your Google account and go to Apps and run the SuperSU and allow to run, then re-install your Google Play apps and enjoy the benefits of Root.
Notes on Root Failure and Restoration1. If your root attempt fails and you followed the prompts correctly, your device will reboot with no ill effects. At the worst case, you may have to re-install a factory rom.
2. If your Toolkit does not list your current build, your root attempt may fail. Mark Skippen's pro version offers the best insurance of build compatibility, PM me on our forum for questions on compatibility.
3. After Android 4.3 apps like OTA RootKeeper will no longer preserve root, so I have prepared a guide to root restoration after OTA Updates.
HereS.Prime
Nexus7Forum.com appreciates your comments and suggests that you post any issues that you encounter, so that the guide can be updated to correct any unanticipated problems. Please remember the choice to root is yours and we accept no responsibility for your device.
Post you Questions and Suggestions
Here.